
Introduction
In this article, we will learn on what are the prerequisites for accessing Dataverse table using PowerShell. PowerShell is powerful tool while working on migrations, performing admin tasks, automating tasks.
Prerequisites:
– Global admin rights
Below are the steps:
- Register an Azure AD app
- Sign in to the Azure portal with admin account, select App registration and click on New registration.
You can also access Azure portal from Microsoft 365 admin center and navigating to Azure Active Directory.
- Enter app name, account type, redirect URI and click on register.

- Copy application client id from application overview page, as we need this for the application authentication.

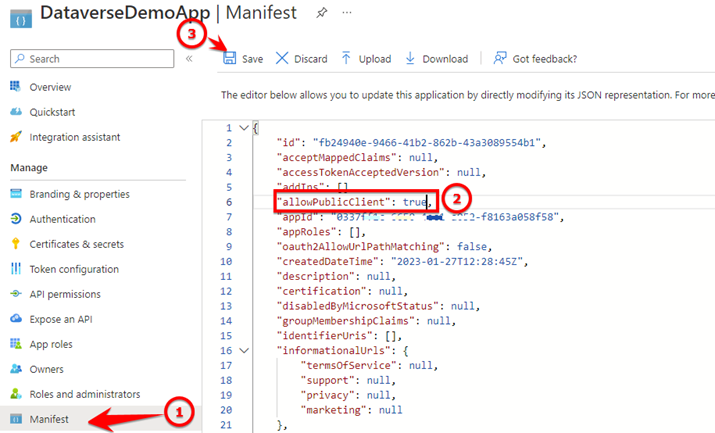
- Select Manifest tab from left navigation, in the manifest editor, set the allowPublicClient* property to true and click on Save.

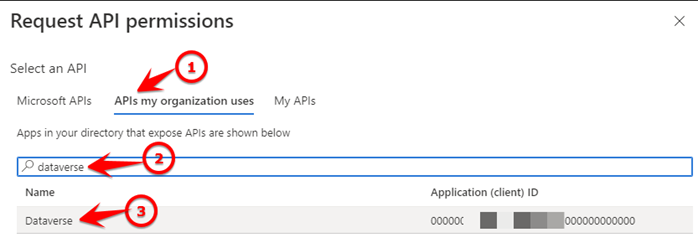
- Select API Permissions tab and click on Add a permission.

- Select APIs my organization uses tab, search for “Dataverse” and select

- Select “Delegated permissions”, check the checkbox option and click on add permission.

- Sign in to the Azure portal with admin account, select App registration and click on New registration.
- Generate the client secret for the new app
- Select “Certificates & secrets” then “Client secrets” and click on New client secret

- Enter client secret description and click on Add.

- Once client secret is created, copy it’s value, id and store it to secure location.

- Select “Certificates & secrets” then “Client secrets” and click on New client secret
- Adding app users and configure roles in Dataverse environment
- Sign in to Power Platform admin center as system administrator, navigate to environments tab. Select your environment from the list and click on settings

- On settings page select Users + permissions and click on Application users

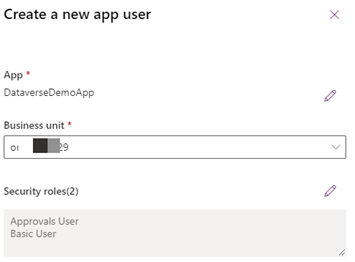
- Select New app user to open the Create a new app user tab and click on Add an app

- Search for app and click on Add.

- Select business unit and click on edit icon next to security roles.

- Select required roles and click on save.

- Review the create app user page and click on Create.

- Once Application user is created select user, select details and refresh details to sync the application user name with Azure add app name.

- Sign in to Power Platform admin center as system administrator, navigate to environments tab. Select your environment from the list and click on settings
- Configure privileges to the selected security roles in Dataverse environment.
- Sign in to PowerApps site as system administrator, select environment.
- Click on settings and select Advanced settings.
- In dynamics 365 portal, click on settings and select security.

- Click on security roles.

- Select security role which you’ve configured in previous steps, I will user Basic User role

- You can view all Dataverse tables in tabs as per type, I have selected custom entities tab for my custom table.
- Now choose privileges for your table, you wanted to grant permissions such as Create, Read, Write, Delete, etc. and click on Save and close.

- Connect to Dataverse environment from PowerShell script1 and get data from table.
- ADD SCRIPT HERE


Output

Conclusion
In this blog, we learned how to configure the Azure AD app and its permissions for accessing Dataverse table content from PowerShell to get data using an OAuth token endpoint API call.
In next article we will see how we can create bulk dummy records in Dataverse table using PowerShell script with OAuth token endpoint.
