
Introduction
In PowerApps, We can allow users to upload multiple files using the Attachments control. In This article we will see not just one, but multiple attachment controls in a single form to handle different types of files separately.
Step 1:
Create Document Library named “Multiple Attachments” and add Below Columns:
- Description – Show this column in Document library Because it’s already available in Document Library
- ActivityRequestID – Lookup from Parent list and Column “ID” (In My Case Parent List is Test Activity)
- RequestID – Number
- DocumentType – Single Line of Text

Step 2:
Go to https://make.powerapps.com/ and I am assuming that you have already created a Gallery screen and added Data source in Gallery. In my case, I added Test Activity Data source. Add View Icon in Gallery and when a user clicks the View icon in the gallery, then it will navigate to FormScreen and will show the details of the selected record using ThisItem.

View Icon Onselect Property Code:
Navigate(
    FormScreen,
    ScreenTransition.Fade,
    {
        Type: "View",
        SelectedRecord: ThisItem
    }
)
Add a “Add New” button in your Gallery Screen and when the user clicks the “Add New” button then it will navigate to same FormScreen but it will use use Blank() to show New form for creating a new record.
Add New Button Onselect Property Code:
Navigate(
    FormScreen,
    ScreenTransition.Fade,
    {
        Type: "New",
        SelectedRecord: Blank()
    }
)
Step 3:
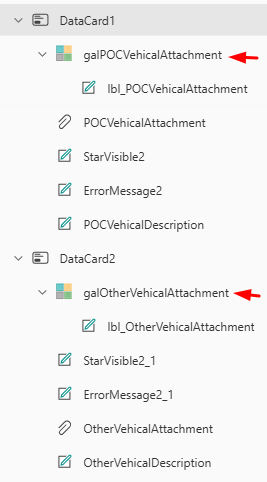
Create a Screen and Give name FormScreen. Add Edit form control and add your data source. In this form, add 2 Custom Datacard(DataCard1 and DataCard2) and in that DataCard, add attachment control and label. Give naming conventions as per below image. You can give any naming conventions as per your needed.
Form Properties:
- Data source = Add your Data source in my case ‘Test Activity’ is data source
- Item = SelectedRecord
- Default Mode = Switch(Type,”New”,FormMode.New,”View”,FormMode.View)

Step 4:
In Form Screen OnVisible Property, applied below logic for filtering attachments based on Document Type and you can give any name of Document Type as you want.
ResetForm(ActivityForm);
ClearCollect(
    colAttchments,
    Filter(
        'Multiple Attachments',
        RequestID = SelectedRecord.ID && DocumentType = "POC Vehical"
    )
);
ClearCollect(
    colAttchments_1,
    Filter(
        'Multiple Attachments',
        RequestID = SelectedRecord.ID && DocumentType = "other Vehical"
    )
)
Step 5:
Now Add Button in FormScreen and give name “Save” and OnSelect Property of Save button, first we collect attachments and after that Submit the form.

ClearCollect(
    colTempAttachments,
    POCVehicalAttachment.Attachments
);
ClearCollect(
    colTempAttachments_1,
    OtherVehicalAttachment.Attachments
);
SubmitForm(ActivityForm)
Step 6:
In Form OnSuccess Property, We will apply logic for Uploading multiple attachments for Different document types. For that, we will create Power automate in Step 8.
Form OnSuccess Property Code:
Concurrent(
    ForAll(
        colTempAttachments As TempAttchments,
        UploadMultipleFilestoDocumentLibrary.Run(
            JSON(
                {
                    RequestID: Self.LastSubmit.ID,
                    Description: POCVehicalDescription.Text,
                    DocumentType: "POC Vehical"
                }
            ),
            {
                file: {
                    name: TempAttchments.Name,
                    contentBytes: TempAttchments.Value
                }
            }
        )
    ),
    ForAll(
        colTempAttachments_1 As TempAttchments_1,
        UploadMultipleFilestoDocumentLibrary.Run(
            JSON(
                {
                    RequestID: Self.LastSubmit.ID,
                    Description: OtherVehicalDescription.Text,
                    DocumentType: "other Vehical"
                }
            ),
            {
                file: {
                    name: TempAttchments_1.Name,
                    contentBytes: TempAttchments_1.Value
                }
            }
        )
    )
)
Step 7:
Add gallery in those 2 Custom Datacards for displaying attachments. Items Property for galPOCVehicalAttachment is colAttchments and galOtherVehicalAttachment is colAttchments_1.
Position for 2 Gallery:
- TemplateSize = 30
- Height = 90
- Width = Parent.Width-60
- X=30
- Y=46
Visible Property for galPOCVehicalAttachment and galOtherVehicalAttachment is = Self.AllItemsCount<>0
Visible Property for POCVehicalAttachment and OtherVehicalAttachment is = Type<>”View” (These 2 Attachments will not visible when form in view mode)
Add 1 label each in both galPOCVehicalAttachment and galOtherVehicalAttachment and set text Property ThisItem.’File name with extension’ and Onselect Property Download(ThisItem.’Link to item’) for those 2 labels.


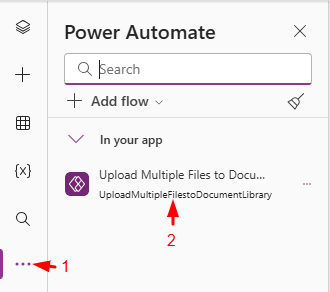
Step 8:
Go to https://make.powerautomate.com/ and Create a flow from PowerApps to PowerAutomate and give name “Upload Multiple Files to Document Library”.

Action 1:
In Power Apps (V2) action, add File Properties as type “Text” and File Content as type “File”.
Action 2:
Add a ‘Parse JSON’ action, set the Content field to the output from ‘File Properties’, and generate the JSON schema using the output from the previous step.
Action 3:
Add a ‘Create file’ action to create a new file in the SharePoint document library.
- Site Address – Add SharePoint site URL.
- Folder Path – Add Folder Path that you want to stored files.
- File Name – triggerBody()[‘file’][‘name’] (write expression for get dynamically file name.)
- File Content – triggerBody()[‘file’][‘contentBytes’] (write expression for get dynamically file content.)
Action 4:
Add an ‘Update file properties’ action to update the metadata/properties of the file.
- Site Address – Add SharePoint site URL.
- Library Name – Name of the document library.
- Id: outputs(‘Create_file’)?[‘body/ItemId’]
- ActivityRequestID Id: body(‘Parse_JSON’)?[‘RequestID’]
- RequestID: body(‘Parse_JSON’)?[‘RequestID’]
- Description: body(‘Parse_JSON’)?[‘Description’]
- DocumentType: body(‘Parse_JSON’)?[‘DocumentType’]
Output:

Conclusion:
Using this article, you can easily upload multiple attachment files with different types from PowerApps to a SharePoint Document Library.
